Loading image...

 © Comma Projects and Alyne Media
 XL900 Ethanol Burner
This built-in fireplace installation checklist walks you through the preparation tasks that need to happen before the installer arrives, in the order they need to happen. It is sequenced for the ventless, zero-flue reality of an EcoSmart Fire built-in, where there is no chimney conversation, no gas line, and no permit dance to schedule around. What replaces all of that is preparation order: fuel-type selection sets the brief, room volume and clearances frame the cavity, and burner configuration locks in the cut-out long before any carpenter cuts a millimetre of plasterboard.
Built-ins touch structural framing, ventilation, electrical (in some ranges), and finishing trades. Getting them out of sequence is what stretches a one-day install into a three-week reshuffle. With the families covered here (Frame, Flex, Heritage, Switch, Motion), the rules differ by fuel type, so Step 1 below carries more weight than the rest of the list combined.
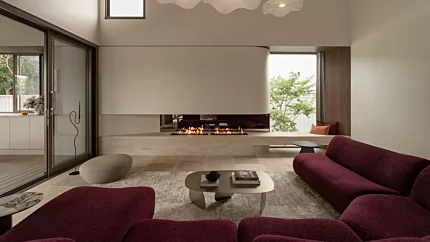
Loading image...
© Comma Projects and Alyne Media XL900 Ethanol Burner
The most-skipped step on every install we see is the one that has to come first. An ethanol built-in and an electric built-in share a category name and almost nothing else: they make different demands of the wall cavity, the room volume, the electrical rough-in, and the finishing trades. Choose the fuel type before you choose the model, and choose both before you frame.
Ethanol built-ins (Frame, Flex, Heritage) need no electricity and no flue, but room volume becomes a safety-critical input. Electric built-ins (Switch, Motion) need no ventilation, but they need a dedicated circuit and a coordinated rough-in. Motion is indoor-only; Switch can sit outdoors under cover. Heat output expectations matter too, because the ethanol ranges put real heat into the room while electric is supplementary warmth at a fraction of an ethanol burner's output.
Range | Fuel | Ventilation needed | Electrical needed | Indoor / outdoor |
|---|---|---|---|---|
Frame | Ethanol | Yes (room volume) | No | Both |
Flex | Ethanol | Yes (room volume) | No | Both |
Heritage | Ethanol | Yes (room volume) | No | Both |
Switch | Electric | No | Yes (dedicated circuit) | Both (under cover outdoors) |
Motion | Electric | No | Yes | Indoor only |
For a quick visual side-by-side of the ranges, the built-in fireplaces collection lays out the families in one place so the format decision can be made on the basis of what fits the space, not what fits the brochure.
Most ethanol built-in fireplaces need at least 5.7 m³ (200 ft³) of room air per 1,000 BTU/hr of burner output. That rule is the single most overlooked checkpoint on the entire installation path, and it is the one we get phoned about most often after the fact.
To check it, multiply room length by width by ceiling height in metres, then add the volume of any adjoining open-plan rooms that share air freely with the install space. Compare the total against the burner rating. A Heritage 26SS, for example, rated at roughly 3.8 kW (13,000 BTU/hrr), needs at least 70 m³ of connected room air, which is the equivalent of a 5 m by 5 m room with a 2.8 m ceiling.
If the room is undersized, there are three honest options: choose a smaller burner, choose an electric range instead, or keep a permanent ventilation path open during operation (a window opened at least 25 mm is the practical minimum). The Fraunhofer Institute's Michael Wensing, working at the Fraunhofer WKI, concluded in emissions testing on flueless ethanol units that adequate ventilation is the difference between safe and unsafe operation indoors. EcoSmart Fire's certified burner technology, developed to UL 1370 and EN 16647 standards, directly addresses these risks by specifying minimum room volumes and ventilation requirements for every model. The room-volume rule is how that principle gets enforced on a checklist.
Electric ranges (Switch, Motion) have no minimum room size. Note it and move on.
Range / Model | Minimum room volume |
|---|---|
Flex 18 | 40 m³ |
Frame 600 / XL500 | 70 m³ |
XL700 | 78 m³ |
Heritage 26SS | 70 m³ |
XL900 | 115 m³ |
Flex 86 (2× XL900) | 220 m³ |
Zero-clearance bioethanol built-ins still need a structural conversation, just not the one a gas chase would prompt. Weight is what drives the engineering here. A Flex 104SS comes in at 146 kg (322 lb); a Switch electric unit can reach 127 kg (280 lb). The wall has to carry that load before any finish goes on.
Larger Flex models (104" through 158") benefit from a quick sign-off from a builder or structural engineer, particularly when the install sits in a stud wall rather than a masonry one. Smaller Frame and Flex inserts are routine for any qualified builder, but the weight check is not optional just because the unit is decorative. Wood and metal stud framing are both acceptable, since the zero-clearance design means combustible framing material is fine against the appliance body provided the published clearances are respected.
Wall cavity depth matters next. The Flex fireplaces sit on a 365 mm cavity depth; Frame inserts run 363 to 403 mm; Switch electric models sit closer to the wall at 292 mm depth; Motion is the shallowest of the family at 239 mm. Heritage sits deeper at 539 mm, which is part of why it pairs so naturally with stone surrounds. Confirm the published physical dimensions of the chosen model against your planned cut-out before any framing carpenter starts. A 20 mm error in cavity height is a finishing-trade problem at best and a re-frame at worst.
If the chosen range is ethanol (Frame, Flex, Heritage), there is no electrical work in the install path. Note it on the checklist and skip the step.
For Switch and Motion, the rough-in is straightforward but worth getting right before plasterboard closes the cavity:
The default supply is 120 V; the 240 V option (a dedicated 20 A two-pole circuit) unlocks the full 3,000 W (around 10,000 BTU/hr) heat output.
The connection point sits at the top right of the firebox opening. Mark that location on the wall and have the electrician dress the cable to it before framing.
Switch units installed outdoors must sit under cover, with the overhang covering at least 50 percent of the fireplace height.
Motion is an indoor-only range. Pencilling Motion into a covered patio brief is the most common selection error we see at this stage; it is not rated for outdoor exposure even under cover.
Coordinate this step with the framing carpenter so the rough-in is locked before the cavity is closed. Trying to add a circuit after the surround is finished is the most expensive way to do this job.
EcoSmart Fire's built-in ethanol fireplaces require a minimum 600 mm (23.6 in) clearance from the flame to fixed furniture and 2,000 mm (78.7 in) overhead clearance to any movable item. Any combustible material closer than the published minimum has to be swapped for non-combustible. A 12.5 mm (0.5 in) air gap between the appliance and the floor surface is mandatory across the ethanol range.
The full clearance envelope to mark on the wall before framing:
600 mm (23.6 in) horizontal clearance from flame to fixed furniture
2,000 mm (78.7 in) overhead clearance to movable items
12.5 mm (0.5 in) air gap between appliance body and floor
1,650 mm overhead clearance from grate to the underside of any TV positioned above the firebox
300 mm minimum from the top of the firebox to the bottom of a TV niche
Motion electric: 914 mm clearance from combustibles applies as a separate, electric-specific rule
Why map this at pre-install and not on install day? Because finishing material choice depends on where the clearance line falls. A timber mantel that lands inside the envelope has to become stone, steel, or plasterboard. Discovering that on install day is what turns a clean install into an awkward conversation.
Flex Series buyers face a configuration choice that the rest of the SERP doesn't even mention: All Flame, Box Left, Box Right, or Two Boxes. The configuration changes the burner footprint, the BTU output, the room-size minimum, and the fuel consumption. It also changes the cut-out, which is why it belongs in the pre-install checklist rather than on the order form.
For standalone burners feeding a custom cavity (the AB, BK, XS and XL series), there's a second dimensioning gotcha: every indoor installation needs a Top Tray fitted above the burner body, and the Top Tray is larger than the burner itself. The cut-out has to accommodate the Top Tray dimensions, not the burner's footprint alone. The ethanol burners collection lists Top Tray dimensions against each burner model; pull those numbers into the joinery drawing before any millwork is cut.
Three checkpoints before sign-off on the cavity:
Burner configuration selected and matched against published BTU and minimum room volume
Top Tray dimensions (standalone burners) factored into the cut-out
Physical model dimensions cross-checked against the framed cavity opening, both width and height
Flex sizing offers 12 opening sizes; Heritage sits on a deeper 539 mm body where Flex sits on 365 mm. Locking the design dimension before framing closes is the single highest-leverage check on the entire list.
The compatible finishing palette is wide: marble, timber, concrete, custom millwork, stainless steel, stacked stone, and integrated cabinetry or media units all work with the built-in ranges. The boundary is the clearance envelope mapped in Step 5. Anything inside the envelope has to be non-combustible. Anything outside it is a design choice, not a safety constraint.
For custom cuts in granite, marble, or stone veneer, work with a builder rather than cutting blind from a render. The combustible-vs-non-combustible boundary is where the joinery drawing earns its keep, because a non-combustible plinth that runs 50 mm too short under the firebox creates an unnecessary fire-rating conversation at handover. Finalise finishing material selection before framing closes so the cut-outs, reveals, and material transitions can be sized correctly.
A side note on Heritage specifically: the 539 mm body lends itself to stone surrounds and timber mantels with depth, which is why it shows up in heritage-style renovations where Flex would feel too contemporary. The depth gives you something to wrap, and the surround design follows from that.
EcoSmart Fire built-in ethanol fireplaces carry UL 1370 certification (USA), EN 16647 BSI certification (UK and EU), and comply with the ACCC Safety Mandate (Australia). The three together cover decorative bioethanol appliance safety standards across the markets we ship into.
Region | Standard | What it covers |
|---|---|---|
USA | UL 1370 (certified) | Safety standard for decorative alcohol-burning appliances |
UK / EU | EN 16647 (BSI-certified) | Safety standard for flueless ethanol fireplaces |
Australia | ACCC Safety Mandate (compliant) | Mandatory consumer-safety standard for decorative ethanol burners |
At pre-installation this matters for three practical reasons: home insurance, building inspection, and warranty validity often hinge on certified product. Confirm the certification documents are on file before the install, not after. There is a regional fuel note worth flagging here too: e-NRG bioethanol is available in Australia, the UK, the US, and Canada, but not the EU; EU customers source bioethanol locally from non-e-NRG suppliers, and the appliance itself still ships and installs the same way. The certification conversation also replaces, in most jurisdictions, the gas or wood permit conversation, since ethanol appliances are decorative and not permitted on the same regulatory track. Local building rules still apply, and a quick call to the local council during planning is cheaper than an inspector visit afterwards.
With the work above done, the install itself runs on the day rather than over the week. Walk the consolidated list one more time before the installer arrives:
Fuel type and product range confirmed
Room volume meets the BTU requirement (ethanol models only)
Wall cavity framed to the published spec
Structural support adequate for the unit weight
Electrical rough-in completed (Switch and Motion only)
Clearance envelope marked on the wall
Burner configuration and Top Tray dimensions confirmed
Finishing materials on site
Certification documents on file
With the cavity prepared and the dimensions locked, a Flex insert can be fitted in under an hour. The hours saved on install day are the hours invested in this checklist.
Three adjacent reads stand up the rest of the planning brief: a deeper look at room size, placement, and design considerations; the chimney-free and ventilation explainer for the ethanol ranges; and the cost breakdown that turns this checklist into a budget. The format question (recessed, wall-mount, or island) is covered in its own piece and is worth working through before final framing if the layout still has options open. Anchor all of that planning back to the built-in fireplace installation checklist above, and the install itself becomes the easy part of the project.