Loading image...

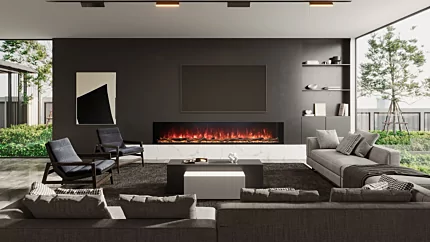
Switch 96SS Electric Fireplace
For decades, the entertainment wall was held hostage by the fireplace. If you wanted flame and a screen in the same room, you had to plan the room around the chimney breast, the structural wall, the flue route, and whatever the gas fitter said was possible. Floor plans bent around the masonry, joinery worked around the mantel, and the TV ended up wherever was left over.
The arrival of zero-clearance electric inserts changed the geometry. A built-in entertainment wall with an electric fireplace insert now sits wherever the design wants it to sit. No flue, no chimney, no gas line, no exterior wall access. Just a dedicated circuit, a framed opening cut to spec, and a finish material that holds the whole composition together.
This guide walks through how to design, specify, frame, wire, and finish that wall from rough opening to handover. It covers the two EcoSmart Fire collections most commonly built into media walls, the rough-opening dimensions that govern the carpentry, the voltage decision that governs the heating output, and the small handful of mistakes that turn a clean install into expensive rework.
Loading image...
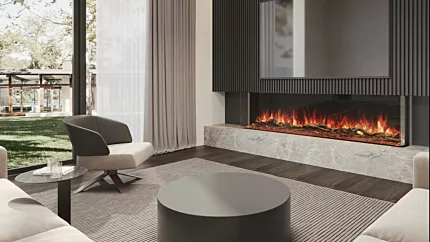
Switch 96SS Electric Fireplace
A built-in entertainment wall with an electric fireplace insert works because the appliance asks almost nothing of the wall around it. There is no combustion, no flue, no gas line, no exterior penetration. The only service requirement is a dedicated electrical circuit, which is something the electrician was already running for the TV, the AV rack, and the cabinetry lighting.
That changes the design conversation. Where a gas fireplace forces an early decision about flue routing, clearance to combustibles, and the position of the unit on an external wall, an electric fireplace insert treats the wall like any other piece of joinery. The 2017 National Fireplace Institute education guide put it bluntly: a zero-clearance design "allows mounting to drywall or any other material, without fireproofing", with "no piping, no venting, no gas lines, no exterior wall access required, no permits". That single sentence captures why media walls have shifted decisively toward electric in recent years.
Bioethanol inserts share some of that flexibility, but they are an open-flame product. The heat plume that rises from a real flame is the reason traditional fireplace and TV pairings raise eyebrows, and it is the reason electric is the natural fit when a screen sits directly above. An electric insert can run in flame-only mode for hours at a stretch with effectively zero heat output, which makes the TV-above-fireplace question a non-issue. We will come back to that in the section on TV placement.
Sizing is where most entertainment walls go wrong. The temptation is to start with the TV and tack the fireplace beneath it, but the three relationships that govern the composition all reach beyond the screen.
The first relationship is firebox width to TV width. The firebox should match or exceed the visible width of the TV. A 65 in TV measures roughly 57 in across the screen, so an insert in the 60 to 68 in viewing-width bracket sits comfortably beneath it without looking pinched. Going wider than the TV adds visual weight and grounds the screen; going narrower makes the screen look like it is hovering over a postage stamp.
The second relationship is firebox width to wall width. A firebox that occupies roughly one-half to one-third of the wall width reads as deliberate. Anything narrower starts to look like a token gesture, anything wider stops being a fireplace and becomes the wall itself. On a 4 m [13 ft] wall, that calculation lands the firebox somewhere between 1.3 m and 2 m wide, which maps neatly onto the mid-range models in our modern electric fireplace inserts range.
The third relationship is mounting height. The firebox top edge typically sits between 36 in and 48 in [914 mm to 1219 mm] off the finished floor. Lower than that and the unit reads as a hearth product; higher than that and the TV centreline climbs into uncomfortable viewing territory.
Our Motion and Switch ranges between them cover twelve insert widths from 30 in up to 124 in. The Motion ladder runs 30, 52, 60, 76, 100, and 120; the Switch ladder runs 44, 56, 68, 80, 96, and 120. That spacing matters because a real design rarely lands on a round-number wall, and having two ladders to choose from usually means one of the twelve sizes drops into the composition cleanly.
For TV pairings, the practical map looks like this. A 55 in TV pairs with a Motion 60 or Switch 56. A 65 in TV pairs with a Switch 68 or Motion 76. A 75 in TV pairs with a Motion 76 or Switch 80. A 85 in TV pairs with a Motion 100 or Switch 96. Above that, the conversation shifts to feature walls rather than entertainment walls, and the Motion 120 or Switch 120 starts to make sense.
The Motion series is 9-9/16 in deep, which rounds to roughly 9.4 in. The Switch series is 11-9/16 in deep, which rounds to roughly 11.5 in. That two-inch difference governs the minimum framing depth of the entertainment wall: 9 in for Motion, 12 in for Switch.
On paper that looks like a small difference. In the wall, it changes the build entirely. A 9 in framing depth fits inside a standard partition wall built with 2x6 timber studs or 152 mm steel studs, which is the same depth most architects already specify for service cavities. A 12 in framing depth needs a furred-out chase, a thickened wall, or a structural rebate. The decision between Motion and Switch is therefore not just an aesthetic choice; it sets the geometry of the wall around it.
Depth also affects how the fireplace meets the finish. Motion's shallower profile pairs naturally with flush, monolithic finishes where the unit reads as a slot cut into a continuous surface. Switch's deeper profile handles heavier cladding, thicker stone, and proud trim details without the firebox getting lost behind the cladding line.
A side-by-side comparison helps frame the decision:
Attribute | Motion series | Switch series |
|---|---|---|
Insert depth | 9-9/16 in (≈9.4 in) | 11-9/16 in (≈11.5 in) |
Minimum framing depth | 9 in | 12 in |
Width range | 30 in to 124 in | 44 in to 120 in |
Indoor / outdoor | Indoor | Indoor and outdoor (under cover) |
Certification | CSA listed | ETL certified |
Finish pairing | Flush, render, micro-cement | Stone, fluted timber, deeper trim |
The two ranges are not interchangeable. They are two different design tools, and the right one is the one that fits the wall the building can actually deliver.
Every model in the Motion and Switch ranges has a specified rough-opening dimension, and the carpenter should be working to those numbers, not to a generalised guideline. The figures below come straight from the EcoSmart Fire and MAD support documentation.
Motion series rough opening (built-in installation):
Model | Framing width | Framing height | Min. framing depth |
|---|---|---|---|
Motion 30 | 29-1/4 in (743 mm) | 24-3/4 in | 9 in min. |
Motion 52 | 51 in | 24-3/4 in | 9 in min. |
Motion 60 | 59-1/2 in | 24-3/4 in | 9 in min. |
Motion 76 | 75-1/4 in | 24-3/4 in | 9 in min. |
Motion 100 | 99-1/2 in | 24-3/4 in | 9 in min. |
Motion 120 | 124 in | 24-3/4 in | 9 in min. |
Switch series rough opening (built-in installation):
Model | Framing width | Framing height | Min. framing depth |
|---|---|---|---|
Switch 44 | 44-3/8 in | 25-1/4 in | 12 in |
Switch 56 | 56-3/8 in | 25-1/4 in | 12 in |
Switch 68 | 68-3/8 in | 25-1/4 in | 12 in |
Switch 80 | 80-3/8 in | 25-1/4 in | 12 in |
Switch 96 | 96-3/8 in | 25-1/4 in | 12 in |
Switch 120 | 120-3/8 in | 25-1/4 in | 12 in |
A few framing conventions apply regardless of model. The base of the firebox should sit a minimum of 180 mm [7 in] above the finished floor. Timber or steel studs are both acceptable; the opening should be plumb, level, and squared, with header and sill members sized to whatever the structural detail above requires. The framing documentation also calls for the appliance to be at least 36 in (914 mm) from combustible materials like curtains, drapes, furniture, bedding, and paper, which is a placement note rather than a clearance-to-combustibles requirement.
One word of caution for the oversized models. Motion 100, Motion 120, and Switch 120 are large appliances inside the wall, and on a freestanding partition or a tall single-storey gable they can sit close to the structural envelope. Have a structural engineer sign off the surrounding framing before the wall is built, especially where the firebox runs through a load path.
The electrical decision is the one that quietly determines what the fireplace can actually do. Get it wrong at the rough-in stage and you are tearing drywall off to upgrade it.
Both Motion and Switch are hardwired appliances, not plug-and-play. Wiring terminates at the top right of the framed opening, and the appliance must be connected to a dedicated circuit. Per the EcoSmart Fire installation guidance, "installation requires a dedicated electrical circuit: a 120-volt, 20-amp circuit for standard units, or a 240-volt, 20-amp circuit for higher-capacity models. A qualified electrician should handle the wiring to meet local building codes and safety standards (CSA C22.1 / ANSI/NFPA 70)."
A 120 V install gives you 1,500 W of heating output, which is 5,000 BTU/hr (1.5 kW). EcoSmart Fire's specifications put that at roughly 28 m² (300 sq ft) of coverage, sufficient for a typical lounge or media room. The wiring is a three-wire connection: white neutral, black L1, and green or bare ground.
A 240 V install gives you 3,000 W of output, which is 10,000 BTU/hr (3 kW). That is roughly 56 m² (600 sq ft) of coverage, which moves the unit from supplementary warmth into a genuine zone-heating tool. The wiring is a four-wire connection: white neutral, black L1, red L2, and green or bare ground, run off a dedicated 20 A two-pole circuit breaker. Both Motion (CSA listed) and Switch (ETL certified) deliver the same voltage-tier output.
The North American codes are explicit. According to the ANSI Blog's overview of CSA C22.1-2024, the Canadian Electrical Code is over 900 pages long and is "generally adopted by legislation" in Canada. NFPA 70, the equivalent National Electrical Code in the USA, runs on a parallel three-year revision cycle. In Australia and New Zealand, the appliance still terminates at a dedicated circuit, but a licensed electrician carrying the relevant state or territory licence must do the work.
The decision matters because the voltage choice is permanent for the life of the wall. The cleanest specification path is to decide early which output tier the room needs, run that circuit at rough-in, and confirm it with the electrician before the drywall goes up. If there is any chance you might want the 240 V output later, run the heavier circuit now and configure it for 120 V operation. For a deeper look at how energy efficiency stacks up across the range, the electric fireplace inserts guide covers the numbers in full.
Yes, you can mount a TV directly above an EcoSmart Fire electric insert. In flame-only mode, the unit draws as little as 42 W of LED power and produces no meaningful heat, so the standard heat-rise concerns that apply to wood and gas fireplaces do not apply.
That is the answer most readers come for, and it deserves a direct statement up front. The mechanism is straightforward. Both Motion and Switch ship with three operating modes: no heat (flame only), low heat, and high heat. In flame-only mode the heating element is off, the LED array runs alone, and the wattage draw across the Switch range is 42 W on the smallest model, 53 W, 76 W, 83 W, 95 W, and 106 W on the largest. Across the Motion range, the LED wattage sits in a similar 30 W to 83 W band. That is less power than most floor lamps, which is the reason the glass above the firebox stays cool enough to touch.
The result is that the TV does not need a heat-rise clearance the way it would above a gas appliance. A typical gap between the firebox top edge and the TV base is 3 in to 6 in [76 mm to 152 mm], chosen for visual composition rather than thermal safety. If the firebox top is at 42 in off the floor, a 4 in gap puts the TV base at 46 in, which lands a 65 in TV's centreline at roughly 64 in. That is at the upper end of comfortable seated viewing, which is why the firebox mounting height matters as much as the gap above it.
Cable management is the other detail that gets forgotten at framing. An in-wall conduit chase between the firebox cavity and the TV mount lets the AV cabling drop cleanly behind the surround without trailing across the front of the wall. Run a 50 mm to 100 mm conduit during the framing stage, and leave a pull string in it for whatever cabling comes later. AV standards drift faster than building codes, and the conduit is cheap insurance.
If you want a deeper look at how the LED array generates the look of flame in the first place, the motion picture flame technology used across the range is what makes the unit convincing enough to use as a focal point. A flat LED panel would never sustain the illusion at the viewing distances a media wall imposes.
Loading image...

Switch 68BY
Once the insert is sized and the framing depth is locked in, the wall becomes a finish problem. The materials that pair best with a built-in entertainment wall fall into a handful of families.
Honed concrete and micro-cement give the wall a continuous, monolithic read. The Motion series suits this approach because its 9.4 in depth lets the firebox sit almost flush in a render finish, with the glass face reading as a slot in the wall rather than a separate object. There is a quiet story behind that depth, incidentally; the Motion profile was designed for exactly this kind of thin-render application, where every extra inch of cavity depth would push the surround off the wall plane.
Engineered stone and large-format porcelain handle the heavier cladding end of the spectrum. Slabs in the 1200 mm by 2400 mm to 1600 mm by 3200 mm range can wrap the whole wall in a single visual gesture, which is where Switch's 11.5 in depth earns its place: the deeper cavity absorbs the slab thickness without pushing the firebox out of plane.
Fluted timber veneer brings warmth to what is otherwise a quiet, dark composition. Vertical fluting at 25 mm to 50 mm centres reads beautifully across the full wall, and the rhythm of the flutes plays well against the horizontal flame line of the firebox. Blackened steel and brushed brass inlays work as accent details rather than primary materials, often as a hairline frame around the glass or as a recessed shadow line between cladding and firebox.
Limewashed plaster has come back into rotation for warmer, more textural rooms. It sits especially well around the wider Motion models, where the breadth of the firebox needs the visual softness of a hand-applied finish to avoid feeling cold.
Integrated shelving and cabinetry deserve their own thought. Niches flanking the firebox give you a place to land books, ceramics, and the inevitable cluster of AV remotes. LED-strip lighting inside those niches, dimmed to roughly 10% of the firebox brightness, sets up a quiet hierarchy in the wall: the fire is the focal point, the niches are the supporting cast. Material continuity between the surround and the cabinetry helps the whole composition read as one piece of joinery rather than a fireplace bolted onto a TV unit.
Outdoor entertainment walls used to be a contradiction in terms. Once the fireplace stopped being indoor, the options collapsed to gas fire pits or wood-burning hearths, neither of which paired well with a screen, a sound system, or a covered patio ceiling.
The Switch series changes that. All six Switch models are approved for outdoor installation under a patio cover or overhang, subject to three conditions: the patio roof overhang must cover at least 50% of the appliance height from the base of the fireplace, side protection must extend at least 50% of the appliance height, and the base of the fireplace must sit a minimum of 2 in (51 mm) above the floor.
What "outdoor approved" does not mean is fully exposed. The unit still has to be under cover, away from direct water contact, and out of direct sunlight. Think of the approved location as a sheltered alfresco zone with a roof, not as a wall on an open-air terrace. That distinction matters because the temptation on a beautiful site is to chase the view, and the right answer is usually to sit the wall slightly inboard of the eaves rather than at the very edge of the slab.
The Motion series, by contrast, is specified for indoor installation. If the design calls for an outdoor entertainment wall under cover, Switch is the only ESF range that delivers it, and the wall depth needs to be the 12 in framing depth that Switch requires.
The use case for an outdoor entertainment wall is almost always the same: a covered alfresco room with a TV, a sound bar, an outdoor kitchen, and a flame to anchor the seating. The Switch series solves the flame requirement without dragging a gas line out to the patio, which removes the regulatory friction that has historically slowed these projects down.
A clean install is a sequence problem. Get the order of trades wrong and you are either ripping out finishes to wire a circuit, or hauling decorative media out to vacuum drywall dust. The four phases below sit in the order the trades should follow.
Phase 1 is framing and rough-in. The carpenter frames the opening to the exact dimensions from the tables above, plumb, level, and squared, with the base of the opening at least 180 mm [7 in] above the finished floor. The electrician runs the dedicated 120 V or 240 V circuit and terminates it at the top right of the opening. Any AV conduit between the firebox cavity and the TV position goes in now, with a pull string left for the cables.
Phase 2 is setting the appliance. Remove the front glass, attach the L-shaped metal nailing flanges to the top and bottom of the firebox, hardwire the appliance to the circuit, and slide it into the opening. Level the unit on the adjustable feet and secure the flanges into the framing with drywall screws of at least 1-1/4 in [32 mm].
Phase 3 is masking and finishing, and this is where most installs go wrong. Mask the entire viewing area before any drywalling, texturing, painting, or finishing work begins. Fine dust gets into the LED housing and the decorative media, and once it is in there it does not come out cleanly. A simple poly mask taped tight around the firebox edge is enough; the cost of doing it is negligible, the cost of skipping it is a unit that needs to be pulled and serviced before commissioning.
Phase 4 is reinstating and commissioning. Install the decorative media (typically Western Driftwood Logs, Canyon Driftwood Logs, or crushed glass, depending on the look), reinstall the front glass, fit any trim kit, and commission the unit via the touch panel and remote. Walk through the modes with whoever will be living with the wall: no-heat flame, low heat, high heat, and any colour or pattern variations the firmware supports.
Trade coordination across these phases is the single biggest determinant of how the project lands. Carpenter, electrician, fireplace installer or builder, and finisher all need to be sequenced against one another, and the masking step at the start of phase 3 is the one that always tries to get skipped. If you read this and remember nothing else: mask before you finish.
Choosing the insert after framing. Depth profile dictates wall build, not the reverse. Pick the model before the carpenter starts cutting studs.
Forgetting the 240 V option. Upgrading from 120 V after the wall is finished means tearing drywall to run heavier conductor. Run the heavier circuit at rough-in even if you are not sure you need the output yet.
Mounting the TV centreline too high. Firebox top at 36 in to 48 in puts a 65 in TV's centre near 64 in to 68 in, which is at the upper limit of comfortable seated viewing. Drop the firebox if the TV needs to come down.
Skipping the masking step before finishing. Fine dust ruins LEDs and decorative media. Mask before any drywalling, texturing, painting, or finishing work.
Specifying Motion for an outdoor zone. Only Switch is outdoor-approved under cover. Motion is indoor only.
Forgetting cable management between firebox and TV. Run an in-wall conduit chase with a pull string during framing; retrofitting it is a drywall job.
A short checklist, organised by phase, that sits well in a job folder.
Design phase. Model selected (Motion or Switch). Insert width relative to TV and wall confirmed. Mounting height fixed (firebox top 36 in to 48 in off finished floor). Surround material specified. Flanking cabinetry detailed.
Specification phase. Voltage decided (120 V or 240 V). Dedicated 20 A circuit confirmed with electrician. Floor clearance set to ≥180 mm [7 in] above finished floor. Indoor or outdoor under cover confirmed.
Framing phase. Rough opening width, height, and depth set to the exact spec from the tables above. Opening square, plumb, and level. Electrical rough-in terminated at the top right of the opening. AV conduit chase routed with pull string.
Finishing phase. Masking applied before any drywall or finish work. Trim kit specified (if used). Decorative media confirmed (Western or Canyon Driftwood Logs, crushed glass). Cable chase pull-tested before drywall closes.
The checklist is short on purpose. There are not many decisions that matter in a built-in install, but the ones that do matter need to be made in the right order.
Framing the opening is builder or carpenter work, and a competent DIY renovator can usually do it. The hardwiring step is not DIY. Australia and New Zealand require a licensed electrician for any fixed-wired appliance, and most US states require a licensed electrician for a dedicated circuit on a fixed appliance, especially at 240 V. The unit is designed to be installed in stages, and the wiring stage is where you bring in the trade.
A typical gap is 3 in to 6 in [76 mm to 152 mm], chosen for visual composition rather than thermal safety. In flame-only mode the unit produces no meaningful heat, so the gap is an aesthetic decision, not a clearance-to-combustibles one.
Yes, with the right structural detail. The Switch range is rated for installation in load-bearing or non-load-bearing walls. For the wider models (Motion 100, Motion 120, Switch 120), have a structural engineer sign off the surrounding framing before the wall is built, especially on freestanding partitions or in walls that run through a load path.
Three things. Depth (Motion 9.4 in, Switch 11.5 in). Indoor or outdoor (Motion indoor only, Switch indoor and outdoor under cover). Flame technology family (Motion runs the Motion Picture flame, Switch runs the Switch FX flame with adjustable patterns and accent colours).
A built-in entertainment wall with an electric fireplace insert is a sequence of small, well-ordered decisions that compound into something the room is built around. Size the insert against the TV and the wall first. Pick Motion or Switch based on the depth the wall can deliver and whether the zone is indoor or outdoor under cover. Decide on 120 V or 240 V before the electrician runs the circuit. Frame the opening to the exact rough-opening dimensions for the chosen model. Coordinate the trades so the masking step happens before the finishing trades show up.
It reads as more complex on paper than it lands in the wall. The reason media walls have moved decisively toward electric inserts is precisely because the build sequence resolves cleanly once the decisions are made in the right order. The fireplace stops being the structural problem at the centre of the room and becomes another finish element in a composition the design controls.
The full range of options across the two collections, with the framing, voltage, and finish considerations they each carry, sit on our electric fireplaces collection page if you want to compare the twelve sizes side by side before specifying.